Rails has rapidly become one of the most powerful frameworks for building dynamic web applications and it is written in the Ruby language. Today there are several startups that use Rails including GitHub, Shopify, Hulu,Quirky, Airbnb. There are also several web development companies that focus on Rails development, among those are Pivotal Labs and Thoughbot. One of the great things about Rails is that it is 100% open-source and as a result cost nothing to download. The framework is designed to make building web applications easier by making assumptions about what every developer needs to get started and it allows you to write less code while accomplishing more than other languages and frameworks.
Rails follows two major guiding principles:
- DRY(Don’t Repeat Yourself) – By not repeating the same code over and over again the code is more maintainable, extensibility and minimizes bugs
- Convention over Configuration – Rails believe it has created the best ways to do many things in a web application and this it follow many conventions rather than having the developer set up many configuration files.
Let’s get Started
We are going to create a simple Blog Post. The first thing you need to do is set up your Rails environment. You should have the following installed:
Assuming that all of those have been downloaded successfully, you now need to install Rails. To install Rails you just type the following in your command line
1
| |
To ensure it is installed correctly run the following:
1
| |
The version should be 4.1.2 or greater
Once your environment is completely setup it is easy to set up a new Rails app. You would enter rails new and the name of the application in the command line. Enter the following in your command line:
1
| |
Rails will automatically run bundler for you, but go to your Gemfile and add any other Gems you wish to use. After you have added them to your file run bundle install in the command line. Now cd into your new application and open it in your text editor. You will see that Rails has auto-generated a number of files and folders for you. To get a full explanation and purpose for each file and folder checkout the Rails Guides for full documentation on it.
Model-View-Controller
Rails follows the model-view-controller(MVC) pattern, which separates the applicaton behavior(business logic) from the input and the user interface. In our case business logic is the model for posts and comments while the user interface is the web page in the browser.
In essence for Rails applications when a browser sends a request it is received by the web server and then passed to the Rails controller, which determines what to do next. In some cases the controller will render a view, an HTML template that gets sent back to the server. In most cases, however, the controller will interact with the model, a Ruby object which is a component of the site(such as a post) and it will communicate with the database. After communicating with the database the controller will step in and render a view, the web page in HTML format.

Models
To get started we need to think about what we need for our application. In our case we are creating a very simple blog and at a minimum we need to think about the posts for the blog and the comments. The posts should have a title and content. The comment should have a commenter and content and post_id which is a foreign key to posts and this bascially states that the comment belongs_to a post. In order to create your model you will write the following in your command line.
1 2 | |
Somethings to note is that model is typically singular. After you write the name of the model(your object) you define the attributes of the object by writing it in the format attribute:type, where attribute is the title and type would be string, text, integer, boolean, date. The difference between string and text is that a string is for short text input usually 255 characters or less and text is user for more input like content which could potentially be more than 255 characters. After generating the models the following should be populated.
1 2 3 4 5 6 7 8 9 10 11 12 13 14 15 | |
The model is responsible for creating your post and comment models as well as your migration files for both models. Let’s look at the migrations. Go to the db/migrate folder and you will see migration files for both create_post.rb and create_comments.rb with a timestamp in front of the name of the file. These files create your Active Record migration and basically setup the structure for the database table which are essentially the attributes for each model. You will see that Rails automatically adds a timestamp which will generate the created_at and updated_at fields in your database and tell you when a record has been added or updated to the database.
1 2 3 4 5 6 7 8 9 10 | |
1 2 3 4 5 6 7 8 9 10 11 | |
rails generate model, also creates your model files. If you go to your text editor in app/models you should now see a post.rb and comment.rb file. Both should look you have a class for the specific modes which inherits from ActiveRecord::Base. In our models we need to tell Active Record how the models are associated with each other. To learn more about associations visit Rails Active Record Association. This is how our foreign key will essentially work. So let’s think about this. For any one post it is possible to have a lot of comments and a comment belongs to only one post. We also want to make sure that a post has at least a title in order for it to be saved and a comment needs to have some content. We can do that by validating the presence of those attributes. Validations are covered in detail in Rails Active Record Validations. So let’s write the following associations in our model.
1 2 3 4 | |
1 2 3 4 | |
Now that we have our models and table configuration set up we now need to migrate the table to actually generate the database table. In you command line run rake db:migrate
You should see that a create_table post and create_table comment were both generated. Visit Rails Database Migrations for more information on Migrations
1 2 3 4 5 6 7 8 9 10 | |
Once your migration finishes a schema.rb will be generated. Go to you text editor and go to the folder db\schema.rbThis will show the layout of your tables, which should look like the following.
1 2 3 4 5 6 7 8 9 10 11 12 13 14 15 16 17 18 | |
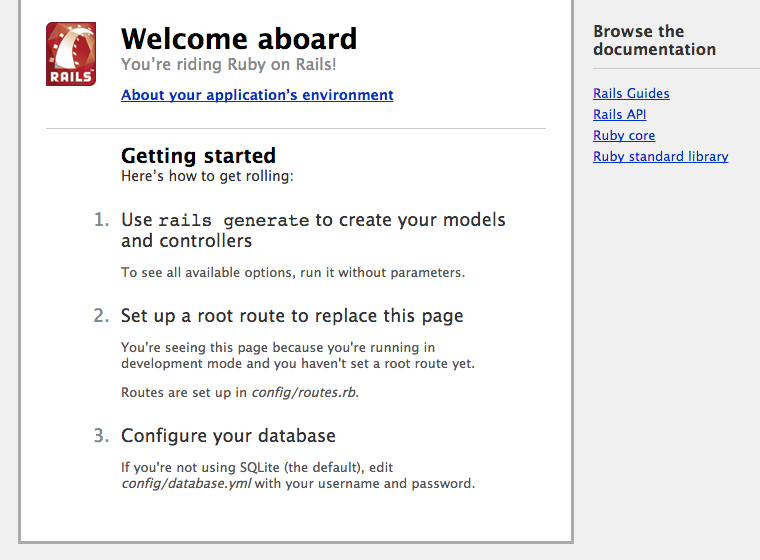
Now let’s see what our website looks like so far. In the command line start your rails server by entering rails s. Once that runs enter http://localhost:3000 in your browser and you should see the following.

In the next section we will begin to render our application in the browser
Controllers
In order to begin to render the application on the page you need at least a controller and a view. For our application we will need to create a Post Controller and a Comments Controller. As we discussed previously the controllers purpose is to recieve specific request from the application. The routers purpose is to decide which controller recieves which request. Each action’s purpose is to collect information to provide it to a view. A view’s purpose is to display this information in a human readable format. View templates are written in a language called eRuby (Embedded Ruby).
To create your controllers you need to enter rails g controller Posts and rails g controller Comments. Notice that unlike your models which are singular your controllers are plural.
1 2 3 4 5 6 7 8 9 10 11 12 13 14 15 16 17 18 19 20 21 22 23 24 25 26 27 28 29 30 31 | |
Generating controllers will create both your controller files and your view files. If you go to your text editor and go to app/controllers you should now see a comments_controller.rb and posts_controller.rb file, which both inherit from the Application Controller. If you go to app\views you will now see folders for comments and posts.
1 2 | |
1 2 | |
Routes
We will now add routes to our application. Please enter the following in your routes.rb file.
1 2 3 4 5 | |
This creates comments as a nested resource within posts. This is another part of capturing the hierarchical relationship that exists between posts and comments. This basically states that comments will only be viewed through routes generated for posts.
Now you can enter rake routes and you should see the following.
1 2 3 4 5 6 7 8 9 10 11 12 13 14 15 16 17 18 | |
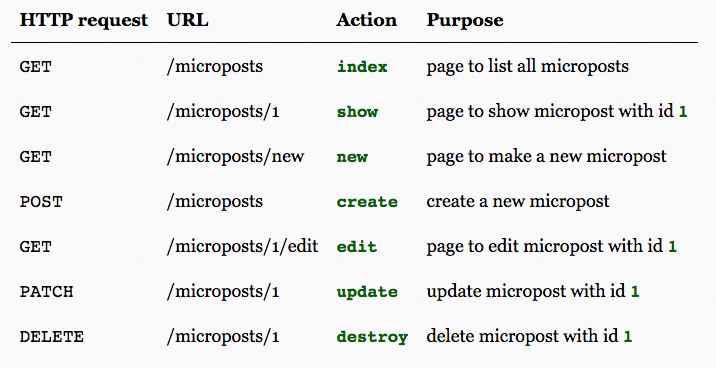
The below graphic represents the implementation of the REST architecture in Rails and explains the URL, the controller action and purpose of each RESTful route.

The root directory or home page will appear on localhost:3000. To set the root directory to a view other than the default root directory, use root :to => ‘Controller#action’. You can set the root directory as a separtate landing page but for our application we will set the posts index page as the root directory by entering root :to => “posts#index” in routes.rb.
1 2 3 4 5 6 7 8 9 | |
In order to see anything on localhost:3000 we will now need to create our post#index view. We do this by creating and index.html.erb file in the app/views/posts folder. In this view we will render all of our posts. We will use embedded ruby. For now lets just write the following in the index.html.erb file
1
| |
if you go to localhost:3000 you should now see All Blog Posts displayed on your root page.
CRUD Post and Comment Controllers
We now need to completely set up our controllers so that we can add, edit, show and delete post and be able to create a comment. We will take care of these actions in our controller which will allow us to collect information and display the information in the view. I will show what should go into each section and explain what it does and what view it will render.
Your Posts Controller should look like the following
1 2 3 4 5 6 7 8 9 10 11 12 13 14 15 16 17 18 19 20 21 22 23 24 25 26 27 28 29 30 31 32 33 34 35 36 37 38 39 40 41 42 43 44 45 46 47 48 49 50 51 52 53 54 55 56 57 58 59 60 61 62 63 64 65 66 67 68 69 70 71 72 73 74 75 76 77 78 79 80 81 82 83 | |
Your Comments Controllers you should look like the following. This will allow you to create a new comment and save it to the database and redirect you the comment for that post.
1 2 3 4 5 6 7 8 9 10 11 12 13 14 15 | |
Views
Now that the controllers and routes have been set up for the Posts and Comments the only thing left to do now is to set up the view. As stated before we will use the embedded ruby to create the templates for all of the views that correspond to the controller actions. You can see all of the views in the GitHub Repository.